Ableton Live: Creating and Mixing Bass-Lines and Drum Tracks
- Feb 23, 2017
- 11 min read
New Order, who doesn't love them? Ever since my parents played me their Blue Monday 7", I fell in love. Ever since I have wanted to recreate that style of music, you know, simple Drum Machine pattern with an Arpeggiated bass-line. So today I will go over the steps in which it takes to create a modern rendition of this style of music.
I am assuming you have a copy of Ableton Live Standard / Studio have used Ableton Live before if you are reading this and know how to set up a session. Before I begin there are a few things you will need to do to make this technique more effective. Firstly, open up the settings and head to the 'Record / Warp / Launch' tab. You will want to make sure "Create Fades on Clip Edges" is turned off as it interferes with the technique we will be using to create the drum pattern. Make sure you also have a set of readily available Drum Samples, if you do not, Ableton has hundred's under the "Samples" categorie, just go through the list and pick your favorite Kick, Snare and Hi-Hat sound!.
Now for the session setup! We will need 3 Audio Tracks and 1 Midi Track at a BPM of 114. We will be making a 4 bar loop, so a good starting point would be highlighting those first 4 bars and pressing CMD + L (or Ctrl + L on windows) to create a loop around the region we plan to work in.
Step 1: Creating the Drum Loop
I recently purchased a series of Classic Drum Machine sample packs off 'Samplephonics' one of which is their LinnDrum pack, a staple drum machine from the 80's. I have opted to use these samples for the project at hand, although I don't seek to replicate any sound, I figured I would pay homage to the era by using those samples.
First instrument we wish to layout is the Kick Drum. We are going to make a 'Four to the Floor' drum beat by placing our Kick on every beat. Simply dragging and dropping the sample into the first audio track and duplicating it to every beat.
- Its great house keeping practice to rename the track's before we get into the thick of it

Now we have the kick sorted, the other two audio tracks will be used for the Snare and Hi-Hat tracks. The Snare will be placed on every second Beat and the Hi-Hat on every 1/8th note (twice per kick as the kick is every 1/4th note)

(I forgot to rename the Hi-Hat track, my apologies)
Step 2: Adding Swing to the Drum Track.
I will be covering two different techniques to achieve a natural swing or groove with the percussion. Swing / groove is very important when creating electronically produced music as it gives the music a human feeling that rigidity and perfect rhythms wont portray.
Technique 1: Track Delay
Track delay is a feature found in the mixer section that allows tracks to play before or after the main tempo. The feature was made for tracking live and making up for hardware latency but can also be used for syncopation of tracks. Track delay will give the drum beat a natural swing as each part is not perfectly in time with one another. My preference is to put the Hats and the Snare in front of the Kick drum as doing do give's the snare a bit of natural phase on the kick.
Turning on track delay is easy, in the bottom right hand side of the program there is a series of buttons, track delay is the small "D" button.

Below are the settings I have put my track to. It is best to set it to sound right by you ear, not visually. The settings I have for my session might not work well with your samples / groove.

Technique 2: Manual Swing
This is the more obvious tactic in which you manually miss place all the samples to give it groove. Doing so you can create more variation in the groove as each track can slightly fall in and out of time, like a real drummer would do so.
Pro Tip: Subtlety is key! Adding swing / groove might not seem noticeable.. mostly because its not meant to. The goal is to create a human feeling to the percussion, so only slight variations are needed.
Which is why I tend to work in the 1 / 512 ratio when doing as its all the small variations within the mix that create such feeling, not the snare itself being out of time. Simply zoom into the sample you want to miss place and shuffle it across.

I use the same principle from technique 1, putting the instruments before the kick seem to give a more natural feeling to it, for me personally anyway.
Step 3: Creating the Bass-Line
We will be making a Octave step arpeggiated bass-Line, to do so I will be using a VST from the Arturia V Collection 5, the Mini V. The VST is an awesome replication of the original MiniMoog, though the synth is very basic, it sounds absolutely awesome. This is the patch i have made for this track:

To Create the Bass-Line, we will need to make a Midi clip to insert the notes in which the VST will play. Simply, Highlight the region you wish to create and press CMD + Shift + M (or CTRL + Shift + M on windows)

Double click the midi clip you just rendered and the Midi Note editor will open up at the bottom of the page. You will need to draw in each note, to do so; Press 'B' to enter draw mode and click where you want each note to start:

The notes are only an 1/8th long at the moment, so you will need to drag them out to the desired length. Press "B" to leave Draw mode and head to the right of the piano roll, you will find a tab that says "Legato". Pressing that will draw each note out to the next, effectively filling all the gaps in the clip.

it will sound a little something like this:
Only Problem, its not arpeggiated.
Technique 1: Arpeggiator Effect
The Arpeggiator is a Midi Affect within Ableton, that only affects Midi Clips. You will want to use the initial preset so just double click on the name. Once loaded up, you should see it appear in the tray below. Seeing as the Init is already set to the rate and style we are seeking, you will only need to change the gate and transpose parameters. Then, set the Gate to 40% and the steps at 1 to jump each octave.

it should sound like this:
Technique 2: Manually Drawing in the Arpeggiation
To make this process easier, we will be utilizing shortcuts but before then we need to prepare our clip. We want to slice our notes into 1/8 notes but only on every 1/4 beat. We will need to go to draw mode by pressing 'B' once again and clicking every 1/4 beat where the note lands, it should look like this:

This is where the octave step comes in, we are wanting the Bass-Line to play one note in 1/8's then play that same note an octave above before it replays on the next 1/4 note. To create this effect without re-drawing each note, we can highlight every note CMD + A or (Ctrl + A on Windows) and then copying them with CMD + C (or Ctrl + C on windows). We then want to place them next to our existing notes, so putting your cursor to the right side of the first note and pressing "CMD + V (or Ctrl + V in window's) will paste the notes.
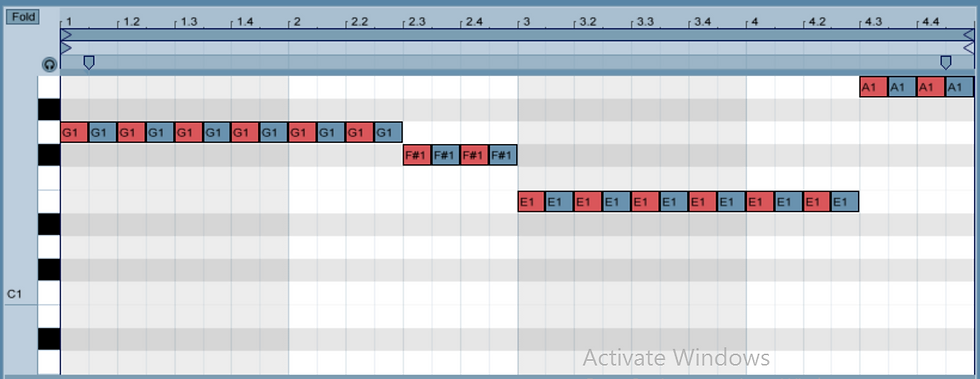
Now that the notes placed, while they are still highlighted we are going to jump them up an octave. Press Shift + Arrow Up key and the steps will be an octave above.

This is how the Clip would sound at this stage:
But due to the notes being exactly 1/8's, there is no space in-between each note. To fix this we will right click on the grid and set it to 1 / 32. Then highlight all the notes once more with CMD + A or (Ctrl + A on Windows) and press Shift + Arrow and the notes will have space in-between each step. Use 'Shift + Arrow' as many times as necessary to create the sound you are going for, I for example needed to go back three steps.

This is what the arpeggiator will sound like:
Step 4: Mixing and Processing
Now we have completed crafting our track, its time to put the pieces together. At the moment the mix is a little muddy and lifeless, this phase will fix that.
Part 1: Drum Track
I want to make the percussion sound crisp and punchy. Grouping the tracks to put them down a single channel to affect them together is the best bet. We do this because the drum track is being played together, it would be unlikely for a real drummer to track them playing the kick in one room and the snare in the next. To group them, simply highlight the tracks you want to group up and click CMD + G (or Ctrl + G).

I will add a Glue Compressor and a Saturation effect to bring the drums into the "warm analogue" realm. Firstly, saturation, double click on the saturation effect in the ableton audio effects to add it to the group. You will want to boost the drive up by around 6dB and turn on 'DC'. Then change the 'analogue clip' to 'sinoid fold'. This will bring the bass / harmonics forward in the percussion.

Adding the glue compressor will bring forward the larger sound over the smaller, putting more emphasis on the kick and snare. You will want to bring back the threshold to about -7dB and bring the makeup to around 6dB. Put soft clip on so there isn't any digital clipping and putting the attack to .3 and ratio at .10 will make the drums incredibly punchy and crunchy.

To clean up the sound I will do a bit of EQ'ing. Only touching up on the Snare and Hi hats. With the snare I will roll off anything below 150Hz so the Kick retains all the low End.

The Hi Hats will be treated the same way but rolling off at around 500Hz to keep clear of the snare.

Part 2: Bass-Line Sidechaining The Bass-Line is definitely the most difficult to mix within a track. Due to the rumble / humming style nature of Low Frequencies, when sounds clash they can leave the mix muddy, so we aim to avoid that as much as possible. Which makes mixing a kick drum and a bass line incredibly important. I will cover three different techniques in which you can achieve a clear mix with within these low frequencies by using Sidechaining.
What is sidechaining? effective stem's from sending the output of one signal into a compressor to reduce the signal of another. I use the word 'stems' due to the morphing from being a tool used by compressors to a generalized term. It is most commonly used when dealing with low frequencies or signals you want to highlight in a mix, commonly being placed on a bass-line to allow the kick drum more breathing room in the mix. I will be covering two main techniques in which we can achieve the sidechain effect.
Lets Side Chain!
Technique 1: Sidechain Compression
The first technique is to just simply sidechain the Bass-Line from the Kick Track through a compressor, this is the easiest of all options as it has the least amount of steps. Simply add a compressor to your bass track and click the downward facing arrow next to the on / off button.

You will want to click the sidechain button on and add the input from the Kick track. That will do nothing to the mix at the moment, you will need to alter the threshold of the compressor to bring forward the sidechainging. I would advise bringing it down to about -15dB.

This is how it would sound:
To allow the kick to cut more, I will bring forward the gain in the sidechain section to create a more intense effect. Bringing the gain up to 10dB will still sound cohesive within the mix but allow the kick more room in the low end.

Technique 2: Fader Sidechain
The Second option is a bit more intense of an effect but will allow for more accurate mixing of the bass. You will want to render the track to allow you manual sidechaining with faders. There are two ways to go about this:
1. Resampling: Creating a second audio track and setting the input to 'Resampling'. Then soloing the bass track and recording into the second 'resample' channel until you have captured all you want to effect.

This is effective as it allows you to keen the MIDI track you have been working on, allowing you to alter notes and so on.
2. Flattening: (Make a duplicate in case you don’t want to commit with this technique) right click on the track name and click freeze. Once that has been done you will want to right click again and click flatten, this will render your track down like this.

Once you have rendered out your track, it is a matter of cutting it where each kick drum hits. Place the cursor over the beat in which the kick hits, Repeat this until you have sliced over every beat.

Under the track name you will see a drop down menu, click that and then select 'Fades'. Now over every track you will see these red lines. What you will want to do is create a fade in to each clip. You should make the fades as long as the Kick Drum hits themselves.

It should sound like this:
Within Context it should sound like:
Technique 3: Splitting the Track
This is my personal favorite as it allows you to create a Stereo Bass-Line. Something that is very common in the 80's was adding 'Chorus' or 'Phasing' effects to bass' to give them a smooth spacey sound. These effects are typically stereo, which is inherently bad for Bass-Lines. We will want to Mono the Bass-Line as the low end will most likely be played through a Sub-Woofer at one point. Sub-Woofers deal with frequencies usually lower then 150Hz and are typically a Mono signal. You don't want the Sub-Woofer to add both channels of Bass into the sub as it will cause issues in the sound re-production and overpower the kick. Because of this, we will want to split both the high and low frequencies of the Bass-Line into their own respective tracks. This will allow us the stereo effects while also gaining a crisp low end mixdown between the Kick drum and the Bass-Line.
You will firstly want to duplicate the track, I suggest renaming them High and Low respectively. Secondly, Adding an EQ Eight to both tracks, on the first track, removing all below 150Hz with the Low Cut x48dB.

And on the Second, Cutting all above 145Hz with the Low Cut x48dB. I do this because the EQ doesn’t cut all below the number you put in, it rolls it off with a Filter, putting the second another 145 will stop the signals from clashing.

The mix shouldn’t sound any different at the moment. Firstly we need to make the Low end (that with all above 145 rolled off) Mono. We do this via the utility folder in the audio effects and selecting "mono'. This cleans up the mix as now only one signal will be entering the low end range, alike the Kick Drum.

This part is up to the reader, you. You can sidechain the low end how ever you like, I will choose the compressor Sidechaining as it is the easiest when using MIDI clips. I will boost the Sidechain gain up to 15dB as you wont hear the effect in the higher frequencies.

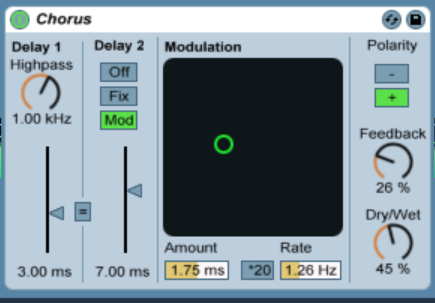
This is where it starts to shine. Adding a stereo effect onto the high frequencies will bring them forward into the mix and have a unique feeling. I have chose a chorus effect with the feedback at 26% and Dry/Wet at 45%.
To bring a bit more cohesion I will add the same saturation effect I have on the drum kit to the high and low Bass-Lines. Via highlighting the effect and pressing CMD + C (or Ctrl + C on windows) then pressing CMD + V (or Ctrl + V in window's) on both the high/ low channels.
Step 5: Finished!
Thank you for reading! you have just follow my tutorial covering multiple different techniques to achieve an 80's inspired Drum beat and Bass-Line's and thus, you have! I have since altered the decay time of my synthesizer patch so there is less constant noise coming from the Bass-Line. Here is the final result, without any master effects!


Stay ahead of the game with the latest Lottery News from KhelRaja. Our online platform not only provides the best gaming experience but also keeps you informed with timely updates on jackpots, draw schedules, and winning stories. We are your comprehensive source for money-making gaming information, ensuring you always play smart and stay connected to the world of big wins!